Category: Home

Houzz Tour: Nostalgic Family Home in Upstate New York

This charming Cape Cod-style home is nestled away in a quiet, kid-friendly suburban community in LaGrange, NY. Owners Peggy and Dennis Maloney happen to be working on making it their own since moving here from the 1980s if their sixth child was born.

Peggy decorated the home with family heirlooms and items that she found at estate sales, antique shops and flea markets. Each one has a unique story behind it, while it’s a rare find from a real estate sale or a souvenir from one of the numerous trips to Europe. She’s “absolutely in love with all the colors white and blue,” she says. “It was an easy choice when selecting paint colors for the house.”

Houzz in a Glance
Who lives here: Peggy and Dennis Maloney
Location: LaGrange, New York
Size: 3,000 square feet; 5 bedrooms

Rikki Snyder

Their primary sitting parlor, (my favorite room in the house), is full of blues, whites, greens and lots of rare collectibles.

Rikki Snyder

The secretary furniture piece in this area was found in an estate sale, along with the green vintage sofa made from the 1940s. “It had been love at first sight,” Peggy says. She had it reupholstered, and it’s currently a primary element in her parlor.

Rikki Snyder

One of Peggy’s most valued collectibles is a blue and gold Limoges porcelain vase from France atop her side table. The fitting green chairs in her parlor add an ideal contrast to each of the whites and blues, adding warm color into a bright, airy and inviting area.

Rikki Snyder

Peggy’s bedroom was kept very easy with blue walls and gentle light blue-and-white accents. A craft room from her bedroom is Peggy’s favorite place to be. She enjoys making a wide variety of crafts like wreaths, Christmas decorations, pillows, blankets and aprons there.

Rikki Snyder

If Peggy’s not spending some time in her craft area she’s frequently off at the kitchen baking. Like their bedroom, the kitchen is very easy with blue cupboards and white accents, though they intend to remodel their kitchen, make new cabinets and adjust the color to cream within the next few months.

Rikki Snyder

When the Maloneys proceeded in, they added a new front entry, making the entryway broader and much more inviting. They also added a screened-in porch off the back, remodeled a bathroom, replaced the carpeting and repainted.

Rikki Snyder

This dining area is their location of family gathering. This space means much to her since she never had a dining room in her house when she was growing up.

Rikki Snyder

Peggy had always wanted a cuckoo clock, and she eventually bought this find while in Bavaria, Germany. “Whenever the grandkids are over and the cuckoo clock goes away they run on to it and observe it in amazement,” she says.

Rikki Snyder

A hutch displays Peggy’s blue-and-white dishes and glassware, reflected here in the dining room mirror.

Rikki Snyder

A hanging Christmas cactus, a philodendron, asparagus ferns and bonsai trees line the front.

Rikki Snyder

At the corner of the dining area are more of Peggy’s blue-and-white dishes from England and furniture that has been in her family for quite a while. Included is a pewter tea collection, which is Peggy’s favorite piece to drink from. You could always expect a nice cup of tea upon entering this charming home.

More Houzz tours:
New York City Design Sensibility at Lowcountry
Playful and Elegant at New York

Next: Tour hundreds of inspirational houses

See related

Kit Houses Stand the Test of Time

Kit houses were America’s first mass-produced, prefab homes, sold by Sears, Montgomery Ward, Gordon Van Tine, Aladdin and also a couple of others. The materials for these homes, ordered straight from a catalog, were delivered to the construction site by truck and rail. Unexpectedly, each the parts, from wood to dividers to the kitchen sink, have been delivered ready for assembly with a local builder or even the owner.

As the prevalence of the kit house grew, so did the available sizes and styles. Sears and many others could produce homes that catered to every pocketbook and every taste. Over 70,000 were sold during America, and a number of these homes are still standing. In fact, there are many communities from Maine to Illinois to California that boast a large, complete collection of kit homes.

Such as the bungalow, the apparel home began with the dawn of the car Age and the consequent growth of inner-ing suburbs.

More: The Bungalow: National Design in the Dawn of the Automobile Age

WINN Design+Build

Cabinet homes came in several distinct sizes, styles and types. All the material for this particular Craftsman kit house would have been ordered through the retailer’s catalog and delivered to site by rail and truck.

WINN Design+Build

As one lot owner after another ordered from the catalog, it was not unusual for whole neighborhoods to be built almost exclusively of kit homes.

WINN Design+Build

Originally small homes for small lots and marketed to budget conscious buyers, these homes have a richness of detail that belies their modest origins.

WINN Design+Build

Kit homes are ripe candidates for renovations and expansions. By adding windows to this living room, this kit dwelling is made more attractive for today’s owners.

WINN Design+Build

Such as the bungalow, the normal kit house kitchen was initially modest and basic. Through renovation, remodel or a potential improvement, these kitchens may meet 21st century needs for spaciousness, convenience and light.

Bud Dietrich, AIA

A page out of this Gordon Van Tine catalog for the “Columbia” version, which the firm also marketed as the “Hudson.” Montgomery Ward marketed a slight variation of this home as the “Cedars,” selling the kit for $2,515. Not bad for each the materials to build a home.

Bud Dietrich, AIA

A 1920s Gordon Van Tine “Columbia” model, bought from a catalog page such as the one above, after renovation and expansion. New siding, windows and front door guarantee the home will be around for another century.

Bud Dietrich, AIA

Many apparel homes that were initially small, frequently only six rooms and one bath, have been expanded for added living space like a family room in addition to master bedroom and bath.

Bud Dietrich, AIA

Ceiling heights from the original kit homes were usually ample, letting new spaces to possess the exact same. An addition to your kit house also affords an opportunity to include windows, raising the quantity of natural lighting from the house.

See related

Houzz Tour: Casually French Birmingham

In Mary Evelyn McKee’s Birmingham house, polished and serene choices really are a mere extension of this designer’s naturally distinguished palette. The Norman-style house reflects her Francophile inclinations, while constantly keeping things slightly casual in family-heavy areas like the mudroom entrance and kitchen. Comfort is key, but it never takes over the sophisticated aesthetic and chic color palette of cream, white, beige and moss green. Carefully chosen antiques complete the spin on traditional, Southern fashion.

Mary Evelyn Interiors

The outside is an architectural example of understated design. With no shutters on the house, the oversize lamp hanging over the door is prominent. The ivy growing up the side allows the house blend in the surroundings.

Mary Evelyn Interiors

The barrel vault-ceilinged foyer leads straight to the garden. French doors in the entryway and back of the hallway bring in a lot of light. Two armless club chairs offer you a place to sit and read.

Mary Evelyn Interiors

McKee wanted to maintain the kitchen conservative, so she put a classic table in the middle and utilized dark grout to offset the subway tile backsplash. Simple white upholstered chairs keep the black and white wood color palette.

Mary Evelyn Interiors

From the kitchen, a drop-down desk is surrounded by storage for dishes, glassware and serveware. The dark gunmetal grey finish feels dramatic against an otherwise white kitchen color scheme.

Mary Evelyn Interiors

Skirted chairs surround a French walnut table in the mushroom-gray dining area. Neoclassical rolls include the grandiose chandelier and lush, gold raw silk drapes.

Mary Evelyn Interiors

A watercolor print of vibrant yellow flowers above a traditional sideboard adds a number of the brightest color in the house.

Mary Evelyn Interiors

The color tones of rock, straw and white are calming enough to permit the various antiques to stand out well. Children’s portraits lean against a mantel flanked by golden French sconces.

Mary Evelyn Interiors

The designer’s long-haired dachshund Nicholas sits to the overstuffed daybed in the living area. A traditional metallic base lamp covers a tablescape of accessories which have shells and crystal pieces. An abstract nude hangs solo on the far wall.

Mary Evelyn Interiors

McKee painted the bedroom a color she calls the”sacred” color. “It is the color of the Virgin’s veils in Renaissance paintings,” she says. A mix of green and blue, the overall effect is very cerebral and calm. The blue-on-blue linens and draperies improve the fairly aesthetic.

Mary Evelyn Interiors

The Fortuny upholstered seat plays off the beige/gold mirror and little walnut table. Local designers are responsible for the little prints she’s layered using plate stands.

Mary Evelyn Interiors

The mudroom entryway includes a bit of country-chic, with baskets and hooks for keeping necessities.

More: See hundreds of inspirational home tours

See related

Chairs with Flair

Chairs are a necessity in every house, and they are available in a plethora of designs, colors and shapes. That said, why does it seem like we are so frequently seeing exactly the very same styles? Not that there’s anything wrong with a great French Bistro seat, a classic Hans Wegner design or a cozy wicker patio loveseat, but sometimes the eye only wants to see something unexpected.

If you are wondering how to bring a little bit of pizzazz to your interior, consider swapping out your seat from something on the unusual side. Not certain what to search for? Check out the photos for a bit of inspiration.

David Churchill – Architectural Photographer

No space is secure from a personality makeover as soon as you plant these seats within its walls. Wood chairs’ beauty is you have the ability.

Glenn Gissler Design

It’s not unusual to put a lone chair alone somewhere in the house, but if you do, search for a person with a little spunk. This bow-tie shaped back provides this traditional seat a motive to stand by itself.

MusaDesign Interior Design

This wall-mounted chair is indeed cool and complicated, you almost think it’s a work of art. It mixes seamlessly into its environment for a sleek, contemporary appeal.

Envision living

If you really want a show-stopper, seek out chrome backless seats with white upholstery for a look that will dazzle. When checking these stunners out you might need your sunglasses.

Adeeni Design Group

For an unusual juxtaposition, seek out wood seats with a contemporary design. The fact that the backs of these chairs remain the same thickness from top to bottom gives them a smooth texture that is so alluring.

VM Concept Interior Design Studio

Settees are fairly common, but a four-seated settee? This piece makes its mark in this conventional foyer.

Sometimes is a bright splash of colour. This yellow chair adds a lively energy to a fairly neutral area.

COLECCION ALEXANDRA

It’s difficult to divert your attention away from the magnificent bed, but after you do, you might notice the totally unexpected chair to the right. Even though it’s a conventional Louis design, it’s been created distinctive with a dash of lime green paint and a painted face.

Ed Ritger Photography

Want a simple way to refresh the seats you presently have? Give them a unique paint treatment. These were once everyday Thonet chairs, but they’ve got their own creative spark.

Tracy Murdock Allied ASID

In case you have a dark room that needs a lively addition, look for a colorful and unusual seat to do the job. The Vermehla seat consists of 500 meters of cotton ropes that were red that were woven.

Elad Gonen

The jury is out on whether these seats are comfy, but you need to admit they are pretty damn intriguing.

The Lettered Cottage

Pair your distressed island with spiral stools to boost the rustic appeal of your country cabin kitchen.

Peter A. Sellar – Architectural Photographer

It’s likely the only thing you will need to do to make your seat more interesting would be to stick it in a very unusual spot. Talk about a bird’s-eye view!

ddc nyc

DRDP – $8,747

Here are a few unusual chairs to delight the eyes. The fluid shape of the splurge loveseat is sure to catch anybody’s eye.

Addison House

The Alaska Chair – $3,356

Another splurge: This futuristic chair looks like it might have been possessed by the Jetsons.

inhabitatshop.com

Cub Children’s Chair – $238

How fun is this kids’ corkboard seat? Who needs a wall as soon as you can pin your artwork directly to your seating.

Shine

Lucerne Chair

Shaped like a tree stump, the Lucerne seat lets you bring the outside in via totally unexpected style.

More:
Chairs at the Air
9 Elements of the Fantastic Man Chair
Three Cs of Feminine Chair Flair
Browse more thoughts for seats

See related

Have a Seat: Clear Alternatives for Lucite Chairs

Thinking about how to work a Lucite seat into your décor? Wondering if a Lucite seat is the right answer? Wonder no longer: These seats are not only chic and stylish, but they might be classic and timeless if presented in the ideal way. So, if you’re in the market for a new seat contemplate your choices, as well as your existing area: Lucite may be the obvious answer.

Iris

The Louis Ghost chair by Philippe Starck is a classic design, and nearly impossible to fail with. A Lucite seat is a great complement to this shallow desk; a solid seat would probably overpower the table.

Tara Seawright Interior Design

Here’s the Louis Ghost chair , paired with another excellent layout: the Kartell Mademoiselle seat. Utilizing two Ghost chairs in the end of the table vs. six Mademoiselle chairs differentiates the look, and the taller Ghost seats add a mid-tier height. The floral toss pillow on the Ghost seats pulls them into the overall scheme.

Laura Burton Interiors

Lucite seats are a excellent option in monochromatic rooms, especially those which are already sparsely furnished. All these Lucite chairs provide room for seats without pulling away the attention from the focal point of the beautiful tub.

Jamie Laubhan-Oliver

If you want a Lucite seat to pop somewhat, dress it up! It looks like the designer tossed a faux sheepskin rug onto this Louis Ghost Chair, giving it a comfy texture.

Elad Gonen

There is something equally delicate and elegant about pairing Lucite chairs with a glass table. This is a good combination in a small space; the transparency of both tricks the eye into believing it is consuming less space than solid options. Colored dishware will add a”floating” pop of color to the tablescape!

Artistic Designs for Living, Tineke Triggs

Or, if space allows, pair Lucite chairs with a obviously cut wood table. The organic element of this dining table is too stunning to be overshadowed by deflecting seats — same goes for the vivid abstract on the wall!

Mal Corboy Design

Get modern chic with blue lighting in the kitchen, and also balance the effect together with Lucite bar stools. The transparency of this Lucite lets the seats take on the same colour.

Studio Marcelo Brito

Look closely — you almost miss the elusive Lucite seat within this pic! With neutrals controlling this seating arrangement, a Lucite seat adds one more spot to sit competing with the surrounding furniture.

Mark English Architects, AIA

If you select a bold color for your kitchen island, be savvy with what you choose for accessories. All these Lucite chairs take the crisp, elegant look vibe this kitchen is dishing while balancing the potency of this orange shade.

When using a Lucite seat feels too cold to you, pair it with a cushion. Matched with this organic dining table and comfy environment, the cushioned seat immediately feels more inviting.

Sigh, another amazing Kartell Mademoiselle seat. Don’t be scared to stick a Lucite seat in an otherwise conventional setting: it modernizes the look with a hint of the eclectic. Plus, in this instance, that the Mademoiselle adds a needed pop of playful color and pattern.

pointclickhome.com

If you have wallpapered or painted your walls in a bold graphic, especially if the flooring or ceiling are contained, work a little Lucite into the space to create an equilibrium. The mirrored table paired using a Lucite seat and table lamp is elegant without interrupting the flow of these great stripes.

HILIT

If you’re not 100 percent on the clear look, look at finding Lucite chairs with a hint of color. The smoky colour of these chairs heighten their existence, and also the further shade of grey gives the overall strategy more attention.

Ashford Associates

It may be somewhat tricky including seating in front of the entry to a space; you do not want to break the flow. However, Lucite seats are a great solution: they sneak in that excess spot to sit, and the room still feels open and relaxing upon entering. Lucite does it again!

More
Glass Tabletops Produce a Room Sparkle

See related

Houzz Tour: Comfort and Elegance for 5

This stylish house near Birmingham, Ala. was created for a busy family of five with three contemporary girls. When the couple realized their home could not keep up with the bustling lifestyle of their fast-growing daughters, they knew it was time for a change. They did not want to leave their neighbors or their locality, though, so that they approached designer and close friend Dana Wolter to help them rework the house that they previously had.

Friends since right after school, Wolter was helping the customer using their house for years and had an intimate knowledge of the family’s day to day lifestyle. They wanted a refined, relaxing and efficient home, so Wolter opened the main floor using arched entryways, used light but lasting textiles, and made living spaces which allow for group activities in addition to time alone.

Dana Wolter

The living area is Wolter’s favored, since it is slightly from the standard. The customer’s daughters really like to come in here and see, so she wished to make a space that would signify that kind of cozy atmosphere. Instead of utilizing a standard setup, she used two lavish velvet chaise lounges.

The wall between the dining area and the living space was pumped out to help with light and flow. “The space is casual enough to curl up with a book or manage the overflow from a celebration,” Wolter says. The sconces are out of Village Firefly Antiques from Birmingham, and the white ottoman is out of Richard Tubb Interiors. The chandelier in the dining area is in the Briarcliff Shop in Alabama.

Dana Wolter

A reupholstered Louis XV style chair and side table makes great use of a vacant corner. It delivers a wonderful way to escape in the middle of the space if need be — or to draw closer. The corner is emphasized by a vignette of vintage and individual items from the clients. Wolter chose to cover the warm hardwood floor in this area with a combination of seagrass and cowhide for a layered, casual look.

Dana Wolter

Another living area on another side of the main floor has a more traditional and slightly formal setup, designed using the exact same soothing and relaxing color palette. Another seagrass rug grounds that the space, and plays the natural materials from the ground lamps out of Visual Comfort, the rustic-style coffee table, and the linen upholstery. A brick fireplace has been painted white, that unifies the room and brings attention to the gorgeous molding.

Dana Wolter

Wolter found the welcoming wing chair at Circa Interiors and highlighted it with a soft pillow in fabric by Beacon Hill. A chandelier out of Visual Comfort provides a feeling of texture and patina from the area. “We picked product by looking at the way we needed each room to function and went out of there,” says Wolter. The customer’s husband painted the corner bookshelf in a grey to complement a piece in their artwork collection over the mantle.

Dana Wolter

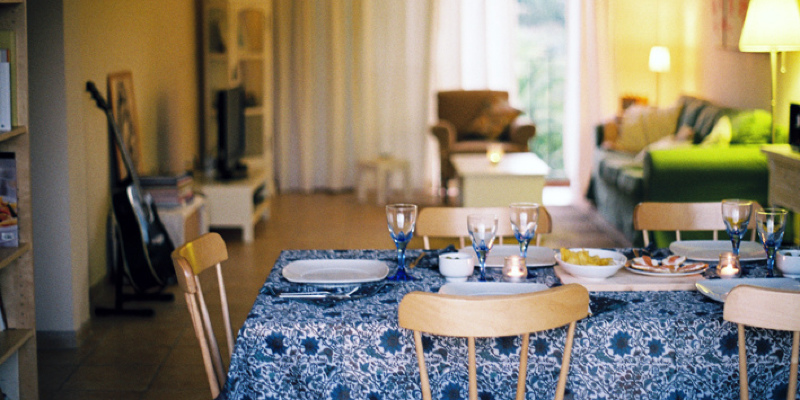
The dining area offers an setting for dinner celebrations and family dinners. Wolter covered a 60-inch round dining table in a drum design faux white leather. While Wolter and the customer wished to use a less costly fabric here and one which was easy to wash — they also wanted something which could bring an unexpected and lavish element to the layout. Antique chairs reupholstered in a pale blue shadow and custom window treatments complete the new but traditional space.

Dana Wolter

Bits of the customer’s classic china collection rest in addition to a vintage sideboard, ready to be put on the table at a minute’s notice. The clients really like to entertain, so creating a house that has been conducive to this — as well regarding the needs of their children — was important. “Their main aim was to make a more functional space whilst still keeping a very stylish home,” says Wolter.

Dana Wolter

Framed black and white photographs of the family hang from delicate chains in the entryway for a way to welcome guests to the family’s house. “To me this home is clean, crisp, and inviting, but also with a small edge,” says Wolter. “You can see glimpses of my style, but more importantly, it reflects my client and her loved ones. I really like that she trusted me enough to integrate what I view as her fashion into her property.”

Dana Wolter

A vignette in one of the halls showcases the customer’s preference for vintage goods and a timeless, well-worn look. “She’s a gorgeous woman, inside and out,” Wolter says of their customer. “Her sense of design is unquestionably seen throughout the house!”

Dana Wolter

Incorporating some classic and traditional design to this Georgian Revival house was a must for Wolter and its own customer. “She had some gorgeous pieces we had purchased for her previous house,” says Wolter. “So starting with this as a foundation and then adding it functioned well.”

Dana Wolter

Wolter had the property’s kitchen completely redone. At first, the area was an awkward U-shape with outdated cabinetry and appliances which wasn’t conducive to cooking, entertaining or eating. Wolter opened the space, inserted an additional arched entryway between the kitchen and the dining area, and place in an island with a marble top. A brand new cooktop was set up on the island, also barstools from Circa Interiors were set under.

Dana Wolter

A breakfast nook at the end of the extended kitchen area uses a gap left by the bay window. Wolter custom designed a metal and wood dining table for nook and used a banquette to supply the majority of the seating. Wolter enjoys to integrate banquettes into her layouts and has been especially happy with the way this one turned out.

Dana Wolter

The clients’ art collection is reflected in many of the darker and bolder tones in the property’s color palette. The grays from the painting over can be seen in the dark pillows accenting peridot chairs in the master bedroom. Even the gold beams of the table lamp and the delicate colors of the marble topped table appear to pay tribute to the tone of the artwork.

Dana Wolter

The master bedroom plays contrasting warm and cool shades in a blend of modern and traditional designs. The custom upholstered headboard has been created additional tall to accent the room’s vaulted ceiling. Wolter had the bedding produced custom as well, and threw another cowhide back on the hardwood floor to help prevent feet from getting chilly in the morning.

Dana Wolter

The linen headboard, beach-like color palette, glass table lamp, and coral remnant almost evoke a relaxing nautical texture — but remains bright enough to work with the rest of the natural elements throughout the house.

Dana Wolter

A contemporary all-white bath was outfitted with tiles and fixtures from Kenny & Company. Sleek and streamlined, it has the exact same form of traditional grounding and natural influences as the rest of the home due to the marble countertop and tile, and the woven straw footstool.

Pictures by Jean Allsop Photography

More thoughts:
Can Your Living Room Be Better With no Sofa?
Houzz Tour: Fantasy House in Toronto
Houzz Tour: Paula Coldiron’s Affordable Fireplace

See related

The best way to Paint Over Glazed Backsplash Tiles

When removing and replacing out-of-date, old or discolored tiles isn’t an alternative, consider painting them as an alternative. Tiles installed on dry wall places, including kitchen backsplashes, may be painted utilizing an oil-based or urethane-based paint. Choose one color or paint styles on each and every tile, or colors to to create a routine. Painting current tiles can start several design options in areas that might otherwise need function that is more invasive.

Clean the back splash tiles properly. Remove splatters, grease or any dirt which could interfere to the the top of tiles. Let the tiles dry totally.

Paint each tile independently with the oil-based or urethane-based paint. By utilizing a paint that includes urethane resin foundation or an oil, you’ll eliminate the need to get a primer. The urethane or oil resin functions just like a glue that bonds the paint right to the tile. Avoid latex paints, that may peel in the surface.

Use an angled brush to paint the edges of every tile. Hold the brush perpendicular to the medial side of stroke and the tile in and down toward the middle. Repeat for every single side stroke through the middle. Try to avoid painting the joints to provide a more practical result to the back-splash.

Let the paint dry completely seal the tiles using a urethane sealer. Paint the sealer onto the tiles with somewhat overlapping strokes. Many sealers dry using a slight gloss. Look in the tiles from a side angle to test for areas which could happen to be missed.

Paint the lines a shade to the tile colour that is new with an artist’s paint brush and paint. Paint the joints throughout in quick strokes. Paint that is grout will seal the grout, therefore there’s absolutely no need to apply an extra coat that is top.

See related

The best way to Paint Foam Composite Trim

As you remodel the the outside of your house to include vinyl siding or one of the maintenance- sidings on the marketplace, you need to include trim which is maintenance-free. Products are available in light-weight foam formulas made from polypropylene, polyurethane, polystyrene and polyvinyl chloride. The bulk of them are available in white while these trims come in many different profiles. In the event that you would like another color trim, it’s required for that you paint this foam composite trim. By painting the trim that is composite, it is possible to enhance the look of your house also as add to its worth.

A rag soaked in mineral spirits or alcohol over the period of the completed side of the foam trim. Allow the alcohol time to dry. It won’t consider extended. This action eliminates any solvent-based chemicals that create a waxy-like movie that stays on the trim in the manufacturing process.

Mix several drops of dish detergent in a gallon bucket of water that is warm. Wipe this combination over the the top of foam composite trim to complete washing-off grime or any chemicals that stays on the area. Rinse with clear water. Let the air that is trim dry.

Sand the area of the foam trim with 220-grit sandpaper. You don’t need to sand the part of the trim that you aren’t painting. This increases the paint’s capacity to to stick to to the foam.

Wipe sandpaper grit and dirt in the trim’s surface using a tack cloth.

A coat of mildew-resistant primer to the uncovered sides of the trim. Allow the primer to dry. Drying times vary as a result of humidity and temperature.

Foam composite trim with two coats of exterior latex paint. Allow the first coat to dry before including the 2nd one.

See related

The best way to Cut Wall Paneling

Wall paneling needs to be cut using methods and specific blades to make sure that it will not chip. Care should be taken to preserve a 90-degree account retaining straight lines which are visible. It’s possible for you to add some character to your own home by even adding paneling into a section of wall for an accent or including wainscoting produced from paneling. You should use a tablesaw to cut paneling.

Blade Choice

Install a panel- a cabinet-maker cross-cut blade on a tablesaw or slicing blade, a blade that is laminate. Raise the blade to 1-inch in the tip of the tooth that is very best, to the idea where the blade emerges in the table. Saw blades are the greatest issue when reducing paneling. The blade that is incorrect splinter and will chip the fragile edges of paneling. Most dining table saw blades are made to reduce deep and quick. They’ve teeth that slice and tear wood. Panel-cutting blades, cross-cut and laminate blades have short teeth that will not chip paneling effortlessly.

Table Saw setup

Measure width or the size which you wish to cut from a sheet of paneling. Set the fence. You parallel to the grain or can cut over the grain. If you’re planning to slice the both instructions to the paneling, it is recommended to cut across or perpendicular the grain because it is simpler to manage a complete sheet of paneling in this way. In the event that you rip a sheet length-wise right into a slim piece, after that it becomes becomes quite difficult for the reason that it becomes floppy and hard to manage, to reduce it to size. Constantly make sure there are saw-horses in entrance and beside the observed to to aid the paneling when reducing paneling on a dining table observed.

Chipping

Mark the entrypoint along with the ex IT point-of the noticed blade on the paneling. Stretch a bit of masking tape from both points of the measurement, and press it down tight. The thought is s O the blade will reduce down through the guts of the tape. The tape stops the blade from splintering or chipping the fringe of of the paneling. The ex IT factors of the blade are moving-in an upward movement as the saw blade passes throughout the paneling. They’ll chip the area off the paneling in the event the teeth occur to catch on-the-edge of the paneling as it ex ITs the blade. The tape stops the paneling from chipping

Technique

Place the paneling on the noticed. Place one-hand on the paneling on both sides of the blade. As you maintain it push back on the paneling. Push the paneling ahead over the blade before the blade emerges out the again of tape and the paneling. One hand should pass to the proper side of the blade on the left and one. Let go of the paneling and change the noticed off. The the thing when slicing paneling is consistently and to move easy. Jerky or stopping actions reduce or can burn up tiny divots in along side it of the paneling. It could also direct to cuts which might be not square.

See related

How to Acid Stain Concrete Countertops

Concrete countertops can include an industrial feel to your own kitchen or bathroom, through the use of coloured acid stain, however you can warm up the area. The stain soaks to the concrete, while keeping the hardiness of your counter, making a deep-level of colour. Be certain to safeguard your cupboards and flooring before you get started — the acid stain can alter the colour on these products along with your countertop.

Your counter-tops completely with water, removing any dirt or residue. If the counter is filthy acid stain will not coat.

Cover sink, flooring, wall and your cupboards . Tape it securely.

Put on gloves and goggles along with a surgical-type facemask, if preferred. Open each of the windows in bathroom or your kitchen and start the array or vent hood to aid eliminate fumes. Mix your acid-base with all the colour bottle, if needed.

Pour a tiny amount of stain on the counter-top and distribute it evenly using a paint brush. Stain it side-to-side as you’d wood, despite the fact that the counter does not have have wood-grain. This helps produce a seamless appear.

Wait 2-3 hours for the stain. Apply another coat, if preferred. The colour will become darker.

Wait 24 hours, then wash the counter-top with a sponge as well as clear water. The sponge sees the leftover residue of the stain that is acid, therefore while cleansing the counter to eliminate the maximum amount of residue as possible, rinse it frequently. Allow the counter-top to dry completely.

Mix 2 cups of ammonia with 5 gallons of warm water in a bucket to produce an acid neutralizer. Alternatively, purchase an acid- neutralizer that is stain out of your supplier that is concrete. This helps set the colour in to the concrete. Wash the counter-top together with the neutralizer completely, then wash a-way the neutralizer with water that is clear. Continue wiping the counter before the water stays entirely apparent. Allow the counter-top to dry.

Paint a straight coating of epoxy penetrating sealer over the acid to aid the counter that is water-proof. Allow the sealer to dry at least 2-4 hrs before utilizing the counter-top.

See related