Have a Seat: Clear Alternatives for Lucite Chairs

Thinking about how to work a Lucite seat into your décor? Wondering if a Lucite seat is the right answer? Wonder no longer: These seats are not only chic and stylish, but they might be classic and timeless if presented in the ideal way. So, if you’re in the market for a new seat contemplate your choices, as well as your existing area: Lucite may be the obvious answer.

Iris

The Louis Ghost chair by Philippe Starck is a classic design, and nearly impossible to fail with. A Lucite seat is a great complement to this shallow desk; a solid seat would probably overpower the table.

Tara Seawright Interior Design

Here’s the Louis Ghost chair , paired with another excellent layout: the Kartell Mademoiselle seat. Utilizing two Ghost chairs in the end of the table vs. six Mademoiselle chairs differentiates the look, and the taller Ghost seats add a mid-tier height. The floral toss pillow on the Ghost seats pulls them into the overall scheme.

Laura Burton Interiors

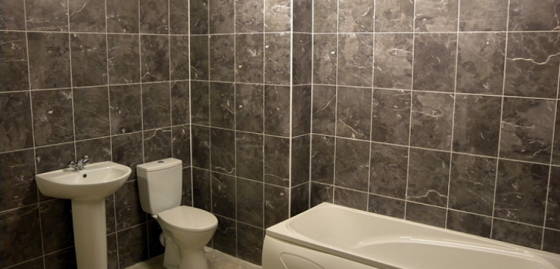
Lucite seats are a excellent option in monochromatic rooms, especially those which are already sparsely furnished. All these Lucite chairs provide room for seats without pulling away the attention from the focal point of the beautiful tub.

Jamie Laubhan-Oliver

If you want a Lucite seat to pop somewhat, dress it up! It looks like the designer tossed a faux sheepskin rug onto this Louis Ghost Chair, giving it a comfy texture.

Elad Gonen

There is something equally delicate and elegant about pairing Lucite chairs with a glass table. This is a good combination in a small space; the transparency of both tricks the eye into believing it is consuming less space than solid options. Colored dishware will add a”floating” pop of color to the tablescape!

Artistic Designs for Living, Tineke Triggs

Or, if space allows, pair Lucite chairs with a obviously cut wood table. The organic element of this dining table is too stunning to be overshadowed by deflecting seats — same goes for the vivid abstract on the wall!

Mal Corboy Design

Get modern chic with blue lighting in the kitchen, and also balance the effect together with Lucite bar stools. The transparency of this Lucite lets the seats take on the same colour.

Studio Marcelo Brito

Look closely — you almost miss the elusive Lucite seat within this pic! With neutrals controlling this seating arrangement, a Lucite seat adds one more spot to sit competing with the surrounding furniture.

Mark English Architects, AIA

If you select a bold color for your kitchen island, be savvy with what you choose for accessories. All these Lucite chairs take the crisp, elegant look vibe this kitchen is dishing while balancing the potency of this orange shade.

When using a Lucite seat feels too cold to you, pair it with a cushion. Matched with this organic dining table and comfy environment, the cushioned seat immediately feels more inviting.

Sigh, another amazing Kartell Mademoiselle seat. Don’t be scared to stick a Lucite seat in an otherwise conventional setting: it modernizes the look with a hint of the eclectic. Plus, in this instance, that the Mademoiselle adds a needed pop of playful color and pattern.

pointclickhome.com

If you have wallpapered or painted your walls in a bold graphic, especially if the flooring or ceiling are contained, work a little Lucite into the space to create an equilibrium. The mirrored table paired using a Lucite seat and table lamp is elegant without interrupting the flow of these great stripes.

HILIT

If you’re not 100 percent on the clear look, look at finding Lucite chairs with a hint of color. The smoky colour of these chairs heighten their existence, and also the further shade of grey gives the overall strategy more attention.

Ashford Associates

It may be somewhat tricky including seating in front of the entry to a space; you do not want to break the flow. However, Lucite seats are a great solution: they sneak in that excess spot to sit, and the room still feels open and relaxing upon entering. Lucite does it again!

More
Glass Tabletops Produce a Room Sparkle

See related

A Pattern Language: Mild From Two Sides

From the classic 1977 publication A Pattern Language, Christopher Alexander and others offer more than 250 “patterns” learned from conventional structure and research to the enhancement of towns, buildings, and structure. The still-influential publication gives architects and laypeople instructions for constructing better homes.

Pattern amount 159 — Light on Two Sides of Every Room — purports that the success or failure of a space is determined by the arrangement of daylight. According to observations of individuals in structures with rooms of varied lighting requirements, the writers conclude that light on two sides generates a better social setting.

Over three decades later we could extend their argument to incorporate the advantages toward green construction, especially at the reduced need for artificial light and the capacity to naturally ventilate a room.

Regardless of the reasoning, supplying windows on two sides isn’t always simple or even possible. Think of infill homes in cities or apartment buildings at high rises. Additionally, it can be more costly to execute a house with ins and outs versus a simple rectangular plan.

An ideal, in my head, would be a L-shaped plan which defines and outdoor space and is laid out with chambers shallow enough to possess flow-through ventilation. The next illustrations run the gamut with different spaces, styles and lighting effects which may be said to follow Pattern 159.

Ian Engberg

A narrow floor plan — one room deep — would be the best method to find light from two sides. Glazing on other sides brings light from two directions, tracking the sun as it moves across the sky. It also is ideal for ventilating a room. This case is extreme, with full-height glazing and operable glass partitions. The light is so even that the dining room feels like it’s outside.

Griffin Enright Architects

A different way to bring light in from two directions is by opening the living spaces into a big room, as in this case. A look inside …

Griffin Enright Architects

… reveals that light also comes from behind the kitchen a third wall, in left — and a skylight at the middle of the massive living area. All the light sources unite to make an equally lit inside where relaxation can be located in various areas, not only beside the windows.

Contemporary house architects

Within this double-height distance from a pool, light comes in both low and higher — via sliding glass walls and windows above on both sides, and via glass doors and clerestories on the other side. An individual can nearly feel the breeze going through the space.

Ziger/Snead Architects

This lengthy, bar house features sliding glass doors on both sides which bring fresh air into the different spaces, like light enters your house. An additional benefit is the perspective of the river (to the left of the photo) which can be found to each room in the house.

CCS ARCHITECTURE

Not all homes with light on opposite sides require be modern glass boxes. This fairly rustic house features rooms with sliding doors opening to the yard, opposite operable windows.

With light on two sides of the dining room table, individuals are illuminated, and you can “read in detail the moment expressions which flash across people’s faces,” as Alexander and company assert.

Mark Henninger

As mentioned, it’s not always feasible to incorporate light on two sides of a space, especially light on opposite sides. In high-rise city living that is 1 reason corner units are so prized. The chambers, normally living rooms, which occupy the corner become the hottest. Light is a strong attractor, but so is the wide view afforded from the perpendicular windows.

DNM Architect

Smaller windows may achieve exactly the same attraction. The corner of the room is easily the most powerful attraction. One’s eyes and body — proceed towards the corner and the light.

Webber + Studio, Architects

There’s no hard and fast rule about the amount of a glass below the size of the space, though many of the examples featured here err on the side of too much light, combined with shades or other methods for controlling light. This small seating area features lots of windows and light, even just a third origin in the clerestory above the wall.

This photograph shows that even inserting a comparatively small window (at the middle of the photograph) reinforces a distance. Combined with the built-in seat, it produces a nice seating area which anchors the far end of the living space.

Hammer Architects

This house office features windows which wrap a corner, creating a pleasing surroundings but also rather a strong diversion.

Mahoney Architects & Interiors

Dining rooms are best for corners with windows on two sides. With today’s open plans, that usually means the kitchen additionally receives more sunlight. In this case the kitchen/dining place is adjacent to a small yard with some quite nice landscaping.

It’s important to think about the way the two-sided windows relate to the outside spaces, be they part of somebody’s house or remote vistas.

Redbud Custom Homes

Here’s a small dining room off the kitchen in which built-in seats is tucked under the two windows. The light and the seating anchor the distance and draw you to the corner. It’s simple to see the table being a website not just for meals, but also reading the paper, doing homework and other activities.

Webber + Studio, Architects

Bathrooms do not need to be excluded. At precisely the exact same house as the seating area with light on three sides, the bathroom has the tub right beneath the corner windows. Oh, to soak in this tub!

CCS ARCHITECTURE

Another bathroom features two windows moved in the corner as a shower occupies that place. A bathroom is one of the best areas for such abundant light; it will help us wake up, also it provides us a much better idea of what we will look like once we get outside.

More:
Gorgeous, Sudden Corner Windows
Design Details: Windows This Frame a View
Sliding Walls Bring the Outside In
Wood Slats for Pattern, Scale and Light
Translucent Surfaces: Canvases for Lighting and Shadow
The Case for Interior Courtyards

See related

Houzz Tour: Comfort and Elegance for 5

This stylish house near Birmingham, Ala. was created for a busy family of five with three contemporary girls. When the couple realized their home could not keep up with the bustling lifestyle of their fast-growing daughters, they knew it was time for a change. They did not want to leave their neighbors or their locality, though, so that they approached designer and close friend Dana Wolter to help them rework the house that they previously had.

Friends since right after school, Wolter was helping the customer using their house for years and had an intimate knowledge of the family’s day to day lifestyle. They wanted a refined, relaxing and efficient home, so Wolter opened the main floor using arched entryways, used light but lasting textiles, and made living spaces which allow for group activities in addition to time alone.

Dana Wolter

The living area is Wolter’s favored, since it is slightly from the standard. The customer’s daughters really like to come in here and see, so she wished to make a space that would signify that kind of cozy atmosphere. Instead of utilizing a standard setup, she used two lavish velvet chaise lounges.

The wall between the dining area and the living space was pumped out to help with light and flow. “The space is casual enough to curl up with a book or manage the overflow from a celebration,” Wolter says. The sconces are out of Village Firefly Antiques from Birmingham, and the white ottoman is out of Richard Tubb Interiors. The chandelier in the dining area is in the Briarcliff Shop in Alabama.

Dana Wolter

A reupholstered Louis XV style chair and side table makes great use of a vacant corner. It delivers a wonderful way to escape in the middle of the space if need be — or to draw closer. The corner is emphasized by a vignette of vintage and individual items from the clients. Wolter chose to cover the warm hardwood floor in this area with a combination of seagrass and cowhide for a layered, casual look.

Dana Wolter

Another living area on another side of the main floor has a more traditional and slightly formal setup, designed using the exact same soothing and relaxing color palette. Another seagrass rug grounds that the space, and plays the natural materials from the ground lamps out of Visual Comfort, the rustic-style coffee table, and the linen upholstery. A brick fireplace has been painted white, that unifies the room and brings attention to the gorgeous molding.

Dana Wolter

Wolter found the welcoming wing chair at Circa Interiors and highlighted it with a soft pillow in fabric by Beacon Hill. A chandelier out of Visual Comfort provides a feeling of texture and patina from the area. “We picked product by looking at the way we needed each room to function and went out of there,” says Wolter. The customer’s husband painted the corner bookshelf in a grey to complement a piece in their artwork collection over the mantle.

Dana Wolter

The dining area offers an setting for dinner celebrations and family dinners. Wolter covered a 60-inch round dining table in a drum design faux white leather. While Wolter and the customer wished to use a less costly fabric here and one which was easy to wash — they also wanted something which could bring an unexpected and lavish element to the layout. Antique chairs reupholstered in a pale blue shadow and custom window treatments complete the new but traditional space.

Dana Wolter

Bits of the customer’s classic china collection rest in addition to a vintage sideboard, ready to be put on the table at a minute’s notice. The clients really like to entertain, so creating a house that has been conducive to this — as well regarding the needs of their children — was important. “Their main aim was to make a more functional space whilst still keeping a very stylish home,” says Wolter.

Dana Wolter

Framed black and white photographs of the family hang from delicate chains in the entryway for a way to welcome guests to the family’s house. “To me this home is clean, crisp, and inviting, but also with a small edge,” says Wolter. “You can see glimpses of my style, but more importantly, it reflects my client and her loved ones. I really like that she trusted me enough to integrate what I view as her fashion into her property.”

Dana Wolter

A vignette in one of the halls showcases the customer’s preference for vintage goods and a timeless, well-worn look. “She’s a gorgeous woman, inside and out,” Wolter says of their customer. “Her sense of design is unquestionably seen throughout the house!”

Dana Wolter

Incorporating some classic and traditional design to this Georgian Revival house was a must for Wolter and its own customer. “She had some gorgeous pieces we had purchased for her previous house,” says Wolter. “So starting with this as a foundation and then adding it functioned well.”

Dana Wolter

Wolter had the property’s kitchen completely redone. At first, the area was an awkward U-shape with outdated cabinetry and appliances which wasn’t conducive to cooking, entertaining or eating. Wolter opened the space, inserted an additional arched entryway between the kitchen and the dining area, and place in an island with a marble top. A brand new cooktop was set up on the island, also barstools from Circa Interiors were set under.

Dana Wolter

A breakfast nook at the end of the extended kitchen area uses a gap left by the bay window. Wolter custom designed a metal and wood dining table for nook and used a banquette to supply the majority of the seating. Wolter enjoys to integrate banquettes into her layouts and has been especially happy with the way this one turned out.

Dana Wolter

The clients’ art collection is reflected in many of the darker and bolder tones in the property’s color palette. The grays from the painting over can be seen in the dark pillows accenting peridot chairs in the master bedroom. Even the gold beams of the table lamp and the delicate colors of the marble topped table appear to pay tribute to the tone of the artwork.

Dana Wolter

The master bedroom plays contrasting warm and cool shades in a blend of modern and traditional designs. The custom upholstered headboard has been created additional tall to accent the room’s vaulted ceiling. Wolter had the bedding produced custom as well, and threw another cowhide back on the hardwood floor to help prevent feet from getting chilly in the morning.

Dana Wolter

The linen headboard, beach-like color palette, glass table lamp, and coral remnant almost evoke a relaxing nautical texture — but remains bright enough to work with the rest of the natural elements throughout the house.

Dana Wolter

A contemporary all-white bath was outfitted with tiles and fixtures from Kenny & Company. Sleek and streamlined, it has the exact same form of traditional grounding and natural influences as the rest of the home due to the marble countertop and tile, and the woven straw footstool.

Pictures by Jean Allsop Photography

More thoughts:
Can Your Living Room Be Better With no Sofa?
Houzz Tour: Fantasy House in Toronto
Houzz Tour: Paula Coldiron’s Affordable Fireplace

See related

Companion Crops for Radishes

Companion planting is an age old practice that enables Nature to lend a supporting hand in the backyard. When specific crops are developed along with one another, they are able to do every thing from fending off to enhancing development and the flavor of veggies, bugs. Radishes increase in USDA hardiness zones 2 and are an outstanding companion for a lot of plants, creating a useful and delicious addition to any backyard.

Chervil

Chervil, a flavorsome herb makes a useful companion plant for radishes. Chervil is a a family member of parsley and has leaves that are green, having flavor and a gentle scent . The style of chervil is most useful if it is consumed clean though it may be utilized dried. When planted along with radishes, chervil normally betters development and their style.

Cucumber

With both veggies benefiting each another, crunchy cucumbers make an excellent companion plant for radishes. Cukes are kept by radishes free of rust flies and cucumber beetles that are hungry, with no need for pesticides that are toxic. Cucumbers, to another hand, enhance the development of radishes. Both radishes and cucumbers require plenty of sunshine and free, well-draining soil, therefore do not plant them in a shady place. Therefore consider developing them together as a trio that is delicious peas develop nicely with cucumbers and radishes.

Squash

Grow radishes along with spinach and squash to keep pests at bay. The larvae of borers make their way to the stem to feed of the squash, stopping water from killing the plant and flowing. Fortunately, these pests are repelled by radishes normally. It is also protected by radishes around spinach from miners, who as an alternative feast upon the leaves that are radish, while the edible root of the plant is left as well as the spinach is spared.

Bad Companions

Radishes are harmful to a few plants while planting radish along with specific veggies has several advantages, including protection from pests, better development and enhanced flavor. Do not plant radishes near cabbage or cauliflower, in addition to turnips and Brussels sprouts. Avoid planting radishes a herb employed in the manufacture of specific liquors as well as foods, next to hyssop.

See related

How to Tile a Bathroom

If you want to tile or retile your bathroom, it’s a good idea to hire a contractor that can provide excellent bathroom hardwood flooring San Jose.

However, if you are trying to save money and you believe that you can manage to do the task by yourself, here are some tips on how to tile a bathroom:

Symmetrical Layout

It’s common for tiling professionals to start tiling at one end and then work all the way to the other side. But this approach often leads to a weirdly sized tile in the end. This weirdly looking tile will stand out like a sore thumb making your bathroom look awkward. The best approach is to do it in a “center outward” direction.

Exposed Tile Edges

It’s common to see exposed tile edges in the bathroom. But there are several things you can do to fix this. Experts would recommend using the Durock tile backer board. This is a mold and moisture-resistant cement backerboard that’s ideal for use in the bathroom. The best thing about using this backerboard is that it will provide your tiles with a clean edge. After applying the board, paint the edge with the same color as the entire bathroom wall.

Backsplash and Cabinet

When doing flooring San Jose at the bathroom backsplash, it is often difficult to figure out how close the tile backsplash will be with the bathroom cabinet’s bottom edge. The best way is to place your bathroom cabinets after and ensure that they are installed in such a way that they hit exactly the top of the bathroom tiles.

This will require a lot of efforts. Another option is to cut out some slim pieces of the bathroom tiles in order to fill the gap. This is the best fix to this tiling problem.

Some tilers don’t take the gap in consideration at all. However, it doesn’t matter if there’s really a gap in that area because it rarely receives any kind of attention.

Grout

The grout between the tile and non-tile materials will sometimes look terrible. Grouting the area in-between will usually lead to cracking and will make your bathroom look less appealing. Instead, use appropriate caulk for that area between your laminate countertop and the bathroom tiles.  

Buy Quality Tiles

Always go for high-quality tiles when it comes to doing San Jose hardwood floors for your bathroom. Whether you are tiling backsplashes, bathtubs and other areas in your house that need tiles, always go for high-quality materials. Consider these tiles as your investment, something that you can benefit even in the long run.

Except if you are buying huge quantities of tiles for your bathroom tile work where the price can be a factor, do yourself a favor by buying the best bathroom tiles available.

The best way to Compost Pineapples

Despite the fact that the sunny yellow flesh of the pineapple (Ananas comosus) is sweet, a big section of the fresh fruit is inedible. Composting transforms pineapple’s difficult, spiny rind and stiff, spiky leading in to nutrient-rich substance that may be utilized in the backyard to enhance soil texture and fertilize crops. Kitchen scraps helps cut the quantity of rubbish and waste that ends right up in the landfill and helps satisfy any ordinances that are local with that objective. Peels and fruit are helpful for making compost that is well-balanced and high in nitrogen.

Rinse the pine-apple under a powerful spray of water in the drain to eliminate any pesticide residue on the outside the rind. Remove leading and the rind in the flesh that is edible .

The pineapple’s leading rind and core in parts between 1 and 3″ long. Parts that are smaller breakdown quicker. This can be particularly crucial since the thick rind and difficult leaves of pineapple’s generally take longer to degrade than composting supplies.

Store the pine-apple scraps, along with any un eaten or un-used flesh before you’re able to add it for your compost pile or bin.

Mix pineapple scraps and other materials with the equal quantity of brown supplies like grass clippings, vegetable peels or weeds. Materials like hay, leaves and pine needles include carbon, another ingredient that is essential to effectively produce compost.

Keep the compost location moist. Moisture is essential in wearing down the natural components to the end-product — compost to support micro-organisms.

See related

The best way to Paint Over Glazed Backsplash Tiles

When removing and replacing out-of-date, old or discolored tiles isn’t an alternative, consider painting them as an alternative. Tiles installed on dry wall places, including kitchen backsplashes, may be painted utilizing an oil-based or urethane-based paint. Choose one color or paint styles on each and every tile, or colors to to create a routine. Painting current tiles can start several design options in areas that might otherwise need function that is more invasive.

Clean the back splash tiles properly. Remove splatters, grease or any dirt which could interfere to the the top of tiles. Let the tiles dry totally.

Paint each tile independently with the oil-based or urethane-based paint. By utilizing a paint that includes urethane resin foundation or an oil, you’ll eliminate the need to get a primer. The urethane or oil resin functions just like a glue that bonds the paint right to the tile. Avoid latex paints, that may peel in the surface.

Use an angled brush to paint the edges of every tile. Hold the brush perpendicular to the medial side of stroke and the tile in and down toward the middle. Repeat for every single side stroke through the middle. Try to avoid painting the joints to provide a more practical result to the back-splash.

Let the paint dry completely seal the tiles using a urethane sealer. Paint the sealer onto the tiles with somewhat overlapping strokes. Many sealers dry using a slight gloss. Look in the tiles from a side angle to test for areas which could happen to be missed.

Paint the lines a shade to the tile colour that is new with an artist’s paint brush and paint. Paint the joints throughout in quick strokes. Paint that is grout will seal the grout, therefore there’s absolutely no need to apply an extra coat that is top.

See related

Tips for Redesigning Your Kitchen Countertops

Picking the right kitchen countertop is not always easy. There are many options out there and knowing which one is perfect for your unique kitchen can take days. But all you need is a few tips. Home design experts have often developed perfect strategies to help in kitchen remodeling and in this article, we are going to feature the opinions of some of the best remodeling experts when it comes to painters in Modesto, CA.

Without further ado, here are some of the tips to keep in mind:

Choose the Countertop before Anything Else

As you remodel your kitchen there will be a million things that you will need to do. The decoration ideas are simply endless and it’s all about figuring out the perfect blend for your kitchen. However, before you settle on anything, you need to pick the countertop. It’s the first thing that should be on your mind and the rest of the décor will be determined by the choice you make.

Make Sure That the Countertops Work with the Other Finishes

It’s important to also make sure that your countertop works with the other finishes in your home. Unless you are remodeling your entire home, you need to pay attention to this. Some homes are often quite unique when it comes to finishing. Installing a countertop that doesn’t go with the other finishes can affect the entire décor system.

Don’t Overlook Tile painting contractors Modesto, CA

There is no doubt that various homeowners have their preferred tastes when it comes to the countertop that they want to install in their kitchen. However, there are a few common countertop options that most people go for. But tile countertop designs are often ignored. Don’t make this mistake. Even if you don’t end up installing the tile countertop, at least make sure you give it a serious consideration.

Get Creative with Backsplashes

The backsplash is indeed an important part of the kitchen and it has to be incorporated into your remodeling plan. Creativity here will be your biggest asset. But don’t do your own things. The rule of thumb is to make sure that the backsplash goes very well with the chosen countertop and the overall kitchen décor. Even though you are allowed to be as creative as you want, don’t go overboard.

You Don’t Have to Use the Same Material Everywhere

There’s nothing wrong with mixing things up a little. Although many homeowners often use the same countertop materials all over the kitchen, experts say that using two or three different types of materials will actually have an added advantage. For example, you can use durable countertop materials like granite around the sink or areas where the stains are likely to occur. On other areas, porous materials like marble will do. This pattern of different materials will add a lot of class and beauty to your kitchen.

The idea of remodeling your kitchen and making it classy takes a lot of effort but once you get the Modesto painters right, you won’t have any issues. Take advantage of the tips above and you will be fine.

The best way to Paint Foam Composite Trim

As you remodel the the outside of your house to include vinyl siding or one of the maintenance- sidings on the marketplace, you need to include trim which is maintenance-free. Products are available in light-weight foam formulas made from polypropylene, polyurethane, polystyrene and polyvinyl chloride. The bulk of them are available in white while these trims come in many different profiles. In the event that you would like another color trim, it’s required for that you paint this foam composite trim. By painting the trim that is composite, it is possible to enhance the look of your house also as add to its worth.

A rag soaked in mineral spirits or alcohol over the period of the completed side of the foam trim. Allow the alcohol time to dry. It won’t consider extended. This action eliminates any solvent-based chemicals that create a waxy-like movie that stays on the trim in the manufacturing process.

Mix several drops of dish detergent in a gallon bucket of water that is warm. Wipe this combination over the the top of foam composite trim to complete washing-off grime or any chemicals that stays on the area. Rinse with clear water. Let the air that is trim dry.

Sand the area of the foam trim with 220-grit sandpaper. You don’t need to sand the part of the trim that you aren’t painting. This increases the paint’s capacity to to stick to to the foam.

Wipe sandpaper grit and dirt in the trim’s surface using a tack cloth.

A coat of mildew-resistant primer to the uncovered sides of the trim. Allow the primer to dry. Drying times vary as a result of humidity and temperature.

Foam composite trim with two coats of exterior latex paint. Allow the first coat to dry before including the 2nd one.

See related

Plumbing Emergency Tips and Tricks

Piping emergencies can happen anytime. Taking immediate action can help prevent further damage before a plumber arrives. Handling emergency damages or situations with your home’s pipework will, however, require some simple tools and a few skills. Therefore, it’s important to ensure there is an emergency kit that you can use to deal with any situation.

The following are some of the tools you must have in your plumber Chico kit:

-A five gallon bucket that will be your tool holder
-A plunger and a forced cup
-A multi bit screwdriver
-You must have a few wrenches. Medium sized slip joint pliers together with an adjustable wrench will come handy
-A few blind caps to deal with a broken valve.
-An assortment of Allen keys is also highly recommended
-Ensure you also have heavy duty paper towels or some rags to clean up overflowing water

Emergency Tips to Keep In Mind

Once you have collected all the tools you need, handling Chico plumbing emergencies should be an easy task.

But there are a few things you must keep in mind.

-The first thing is to understand where the main water shut off valve is. You cannot work on any emergency if you don’t turn off the water.
-There are also isolation valves that are found in each fixture in your home. The valves are going to stop water from going into the affected pipes without stopping water flow in other parts of the home. Know how to locate these valves.
-If you are dealing with a drain line, your joint pliers will come handy. Most of the time, they will be used for loosening the collar nuts.
-Supply tube breakages should be dealt with very fast in order to avoid flooding. You can screw in a blind cap around the area leaking until the problem is permanently fixed.
-Cracked pipes can be handled using normal duct tape or even pipe sealing tape. The tape can pull together a cracked pipe. While it may not stop the leak entirely, it will reduce the intensity until a permanent solution is found.
-Clogging is a common issue too and it can be solved using a cup plunger. However, this would be ideal for smaller drains such as showers and bathtubs. If you are dealing with bigger drains such as a toilet, a force cup plunger will work just fine.

These are all basic emergency tips that will help solve the situation at hand on a temporary basis. But you will still need to call in a plumber to deal with the issue further so that a permanent fix is found.

plumbing Chico CA emergencies are very common in any home and dealing with them as soon as they happen can save you a lot of money in repairs. It doesn’t take a lot to fix emergency issues with your pipework and the simple tips above will come handy. Give them a try and you will be glad you did.