Author: Legre1931

Life in Italy Inspires a California Renovation

Beatriz Macias and her husband left their home in Southern California to live in Italy for a little while. When they returned, they found their home with fresh, European-influenced eyes and decided their kitchen had a makeover pronto. Their Cape Cod–style home was constructed in the 1980s, and it had been showing its age.

“I have always loved secondhand shops, saving the money and finding things which are different,” says Macias. “I found a lot of good deals on things for the kitchen renovation which I realized I had a knack for this.” She found a pleasure, like-minded community, and all of them help one another spot treasures employing the hashtag “thriftbreak” on Twitter. About a year ago, she decided to take her knack to Etsy and opened a shop, Mid Mod Mom.

at a Glance
Who lives here: Beatriz Macias, her husband and Fernando Gonzalez and their 15-year-old kid
Location: Mission Viejo, California
Size: 3 bedrooms, 2 1/2 bathrooms

Mid Mod Mother

“Italy inspired our renovation,” says Macias. “There’s so much great eating and cooking, and we found so many wonderful kitchens there.”

Tables topped with Cararra marble inspired the countertops. “This marble isn’t suitable for everybody; it chips and it stains, but I fell in love with the gorgeous patina it acquires,” she says. “Though I will admit that first blot hurt”

Pendants: West Elm (with Edison bulbs); cupboards: Ikea; range: Bertazzoni; fridge: Whirlpool; dishwasher: Maytag

Mid Mod Mother

“My husband and I had a lot of fun doing the work,” Macias says. “I did the tiling and set the cabinets together, along with my husband looked after the pipes and the appliances. We called in a friend to do the electric work.”

The tile is out of iconic California firm Heath Ceramics and goes with a nature-inspired color palette which Macias has always loved.

A number of her thrifted uncovers include a Neva Time Square clock, an Alessi Fruit Mama along with also an Alessi tea kettle.

Mid Mod Mother

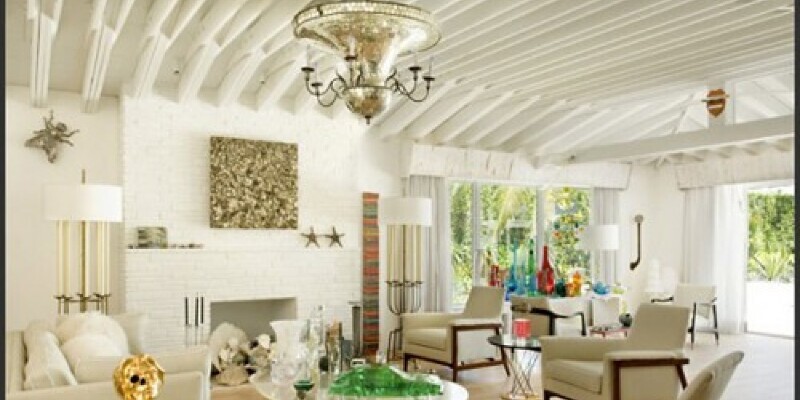
Renovations in the kitchen spilled over to the living room, where the fireplace surround received a coordinating makeover with Heath Ceramics tile along with Carrara marble. “I used the very same stuff to wed the two spaces. I also carried the color palette through the family area along with the powder room,” says Macias. They also expanded the hardwood floors into the kitchen, which formerly had tile.

Mid Mod Mother

A couple favorite estate market discovers will not make it into Macias’ Etsy store, including this selection of midcentury glass. From left to right, there is an amber vase by Arthur Percy for Gullaskruf of Sweden, a green Empoli vase from Italy, a teal Blenko decanter by Winslow Anderson plus a Blenko sheared bowl by Wayne Husted. The mirror behind the collection visually doubles it.

Lamp: Artemide’s Nesso lamp, initially designed by Giancarlo Mattioli in 1967

Mid Mod Mother

This bench is adjacent to the entry. “We take off our shoes once we enter the house, so this bench is a fantastic spot to sit down and take off our shoes,” says Macias. There are baskets underneath for lace footwear.

The color palette was inspired by one leaf. “I adore all the fall colours,” says Macias. “I took a leaf I loved with greens, apples and pears inside into Home Depot and matched paint colours. I figured nature put them together to work collectively.”

Mid Mod Mother

Here is a view from the staircase to the living area. “I found the cowhide in Colombia, folded it up and brought it back into my suitcase,” says Macias. The Domino Mobler armchairs were an estate sale find, the sleeper sofa is from Crate & Barrel and the coffee table is Drexel Heritage. Prints by neighborhood artists and Macias herself make up the art wall.

“We Colombians often travel in hordes, thus we need the additional sleeping area supplied by the sleeper sofa,” says Macias, laughing.

Pendant mild: David Trubridge Coral Pendant

Mid Mod Mother

When folks are sleeping over, Macias and her husband turn off their dueling cuckoo clocks, but they’re totally utilized to hearing them cluck each hour. One of these is that a family heirloom, and the other is a more recent Craigslist find.

Mid Mod Mother

Lucite dining seats keep more visual space open and make the room appear bigger. The cloth on the table is a suzani in the Grand Bazaar in Istanbul. A granite bowl retains sea glass and pebbles the family has collected on beaches throughout their global travels.

Mid Mod Mother

The dresser was “my best find,” says Macias. While she initially had a credenza in head, when she came across this dresser she knew it was ideal and well priced, but she had a big voucher. Such is the thrill of thrifting.

Mid Mod Mother

The nature-inspired palette continues into the downstairs bathroom’s Marimekko ginkgo wallpaper.

I asked Macias if she has ever wished she had kept among those treasures she’s sold throughout the Etsy shop. “No regrets yet,” she explained. “I’m pleased to send them off to some fantastic new home.”

See related

5 London Homes That Score Major Design Points

As the world participates with cheer over the start of the Olympic games, I thought I would collect a few London homes that score high when it comes to home design. With these two modern spaces, a minimalist contemporary shed/office and a couple eclectic row homes, London is showing in more ways than just one that it’s a town teeming with winning imagination — particularly in regards to the home. See for yourself below.

Contemporary Bath in West London

This luxury bathroom is situated on peak of a four-story home. Its most striking feature is that a wood-trimmed curved wall. The partition splits the space in 2; on one side is the sink and vanity, along with a full-height shower unit and steam space (left curved wall).

On the opposite side of the wall is a soaking tub that is used by the woman of the house.

A wider perspective of the toilet from the opposite side of the curved wall shows a heated towel rack, ample bench space and, in the background, a part of the glass device that comprises the full-height shower unit.

Hint: When it comes to making a statement, think outside the box. Here, the trailer is equally a partial wall and a sculptural statement bit.

Office Sian Architecture & Design

Shed/Office in East London

This 150-square-foot home office belongs to freelancers who wanted to feel a strong connection to their own garden space and the outdoors from within the office.

The builder used easy and durable materials sourced in the local and sustainable companies. He also made sure that the substances maximized insulation levels within the shed to keep energy costs as low as possible.

Office Sian Architecture & Design

Hint: Contemplate fully retractable doors for outdoor sheds and home offices that are different from the main property. These doors allow the homeowners to fully enjoy their backyard from within the shed and enable them to entertain from the shed throughout the winter months.

Beccy Smart Photography

Attic Bedroom in Southwest London

This boy’s room is just one of 2 rooms that was a top-floor attic in this terrace home. The mom had the smart idea of dividing the attic into two different bedrooms so that each of her childrend could have his own space to sleep and play.

Beccy Smart Photography

Hint: The homeowners maximized the light coming in by the bedside window by simply maintaining the room’s furnishings and walls in a crisp white with bright squares, creating a bright, light-filled interior.

Beccy Smart Photography

Eclectic East London Master Bath

This year, originally from Canada, saved space in their Victorian home by putting their cupboard in the same place as their toilet; it made complete sense to them to have the dressing room in which they began and ended every day.

Beccy Smart Photography

Hint: Take dangers on your toilet furnishings. Do not be scared to put on your master bathroom a contemporary light pendant usually found above kitchen islands or even a hide slipper seat from an entryway.

Increation

Contemporary Riverside Kitchen in the Docklands

rather than feeling helpless by the huge pillar in this modern home, the designer simply worked about it. He took focus away from the visual interruption by creating a stunning blue backsplash that immediately draws the attention and provides the neutral space a welcome punch of color.

Hint: Personalizing your home can go beyond family photos on the wall and monogrammed pillowcases. This homeowner requested the designer to match the hue of the backsplash for her son’s eye color — now that is personal.

See related

Guest Groups: Honeycomb-Inspired Home Accents

Designers everywhere are embracing honeycomb as the bee’s knees. This simple geometric pattern can cozy up a traditional space or breathe a little energy to a contemporary one. Bring a bit of nature’s distinctive design in your home with this roundup of contemporary honeycomb accessories. Beth from The Modern Home

YLiving.com

Japanese Cowhide Rug – $1,560

Here’s a great twist on the standard cowhide rug: hexagons! The one thing that can make this better is using each one be another piece. Carpet tiles are really suitable for so many reasons, such as flexibility with design, simple cleanup, etc..

CB2

Coup Clover Pillow – $14.95

With bold colors and a graphic pattern, the Coup Pillows from CB2 will cheer up any dull space.

CB2

Hive White Storage Unit – $99.95

The exceptionally reviewed Hive Storage Unit from CB2 would look fantastic in multiples.

Walter

Hex Paintable Wall Decor – $42

These hexagon wall applications are all primed and ready to be painted on your preferred color. I’d love to put in a small set of yellow ones running the length of the hallway.

The Modern Shop

Lacquer Hexagon Tray by Jonathan Adler – $217

Organize your stuff or serve your guests with Jonathan Adler’s Lacquer Hexagon Tray. The tray is sold in six vibrant colors, and I would hard-pressed to pick a favorite.

India Rose

Honeycomb Doormat – $42

I have a friend who recently remodeled a wonderful small midcentury modern ranch, and this rug would add a fine finishing touch with his entry. The hexagon pattern and vivid orange color give this contemporary doormat a cool retro vibe.

Lighting-Buy

Honeycomb Green Ceramic Vase

Add a pop of green with this contemporary honeycomb vase from Urban Trends Collection.

West Elm

DbO Home Botanical Vase – $24

This pretty vase takes me back to my own days in art course. The mould was created via a relief technique using actual honeycomb pressed into the clay. It provides me a “why didn’t I think think of this?” feeling.

1stdibs

by Ronan & Erwa

The Quilt Chair from Ronan & Erwan Bouroullec looks so soft and squishy. It would be ideal for curling up with a novel.

The Rug Company

“Honeycomb” Rug

If only I had the money to spend on the Honeycomb rug by Tara Bernerd. It’s amazing, but it’s definitely out of my budget.

Madegoods

Cole Object

Want to bring a small luxe to your decor? These golden, honey-colored dodecahedrons would look lovely on a table or shelf.

Linens ‘n Things

Baxton Studio Honeycomb Modern Dining Chair – $342.99

Offered in transparent red or clear Lucite, these acrylic seats would make a exceptional addition to your dining room.

Plushpod

Honeycomb Desk – $8,360

Yes, this Honeycomb Desk is $8K, but it’s slick. I will give them.

Träullit Dekor

Träullit Dekor Hexagon

Though they’re not just soft, I feel these sound-proofing hexagons would make a fantastic padded-room effect.

IKEA

Hönefoss Mirror – $14.99

Hönefoss hexagonal mirrors are modular and can be customized however you’d like.

Acme Party Box

Silvered Chisel Votive – $18

The silver-plated honeycomb pattern provides an elegant touch to those tiny glass votives.

FastFloors.com

Porcelain Hexagon Mosaic, White – $4.04

A hexagon floor tile is a wonderful alternate to cent round tiles. I favor simple white porcelain, but I have seen several beautiful mosaic styles.

West Elm

Honeycomb Bath Accessories – $4

These beautiful ceramic bath accessories from West Elm are fairly subtle using the texture and would look great in any bathroom.

Luceplan

Honeycomb Light

The Honeycomb Light from Luceplan might be a little too industrial for a few tastes, but I think that it would look pretty sweet hanging over my table.

Williams-Sonoma

Nordic Ware Honeycomb Cake Pan – $36

Do not wish to make a permanent commitment to honeycomb on your decor? Instead, enjoy a tasty honeycomb-shaped cake with this particular cake mould from Williams-Sonoma. Yum!

Next: Designing With Nature’s Perfect Form

See related

Can You Place Any Size Bar on a Stihl Chain Saw?

A chain saw’s manual bar determines the size of wood the saw can cut, and also the size of a saw engine determines, in large part, how long a bar the saw can handle. Guide bar length also results in the saw’s weight and ease of handling; a long manual bar is comparatively heavy, and it moves the saw’s centre of gravity away from the operator, making the saw trickier to control. All these factors lead Stihl to specify a recommended variety of guide bar lengths for each of its series saw models.

Homeowner Chain Saws

Saws designed to perform typical residential cutting and pruning tasks usually have smaller motors than heavy-duty saws, and they are able to handle only relatively short guide bars. Stihl recommends its MS 170, MS 171, MS 180, MS 181, MS 192 and MS 211 homeowner versions be outfitted with direct bars between 12 and 16 inches. The MS 250 and MS 251 versions are outfitted with larger 45 cc engines and are capable of forcing an 18-inch bar.

Heavy-Duty Chain Saws

A step up from homeowner saws are saws designed to handle bigger tasks in non-professional configurations; they are intended to be equally versatile and powerful. Stihl calls this kind of saws its own”Farm & Ranch” versions, and their engine sizes range from 50 cc to 64 cc. All these versions — which include the MS 271, MS 291, MS 311 and MS 391 — can take direct pubs between 16 and 20 inches.

Professional Chain Saws

The characteristics that differentiate Stihl’s professional-grade saws are intended to make the saws dependable, powerful, comfortable and equipped to stand up to the rigors of everyday use. The expert versions vary considerably in size, in the MS 150 arborist saw, which has a 12-inch bar, to the massive MS 880, whose 121.6 cc engine can deal with a 59-inch bar. At the middle of the range, versions include the MS 261, which can take a bar between 16 and 20 inches; the MS 362, which can accommodate a bar up to 25 inches; the MS 441 and MS 461, which can take a bar up to 32 inches; and also the MS 660, which carries a bar up to 36 inches.

In-Tree and Electric Saws

Saws designed to be used by professional arborists in trees, the MS 192 and MS 201 versions, can take direct bars between 12 and 16 inches. Stihl’s electrical saws come in 3 different sizes: the MSE 140 can take care of a bar between 12 and 16 inches, the MSE 180 can shoot a bigger 18-inch bar, and the MSE 220 carries a bar between 16 and 20 inches. The little battery-powered MSA 160 is equipped with a 12-inch bar.

See related

Should a Grow Light Be From Vegetable Plants?

Seedlings need extreme light to fuel their initial spurt of expansion and healthy leaf formation. They need 250 to 1,000 foot candles of light daily. A standard fluorescent bulb may provide enough light when it’s put close enough to the seedlings so they receive the optimum intensity. Multi-light fixtures supply more even lighting over a broader space, therefore all parts of the seedling can receive equal illumination.

Fluorescent Lights

Fluorescent bulbs don’t produce heat such as other lighting options, so it’s possible to place these considerably nearer to the seedlings. Putting the fixtures so that they are 2 to 6 inches above the surface of the foliage offers high-intensity light. The 2-inch height works well for smaller seedlings or if you’re using reflectors round the light tubes to better distribute the light. Placing the tubes at 6 inches provides light over a greater area, which can be favored for taller seedlings or if you don’t have reflectors installed. Use a combination warm-white or tubes and cool-white grow light.

Incandescent Lights

The heat from incandescent bulbs, such as a regular light bulb, can burn or dry out seedlings if it’s put too closel into the young plants. If you have to use incandescents, set them at least 12 inches above the tender seedlings. Incandescent lights don’t offer the suitable lighting spectrum for tender seedlings, so it’s best to blend these with natural sun or a fluorescent bulb when possible. Use a thermometer to manage the temperature with these bulbs. If the seedling area begins to warm above 75 degrees Fahrenheit, the bulbs are too close and may damage the crops.

Light Duration

Keeping the lights on long enough daily ensures that the seedlings get light. Even when set just above the seedlings, artificial lighting is poorer than sunlight. As the plants need sunlight generally, lights should be left on for the length of time. Most seedlings need eight hours of sun daily, therefore leave the lights on for 16 hours each day. Placing the lights closer won’t compensate for time that is insufficient . An automated timer works for handling them.

Lighting Stands

A lighting stand adjustment of light elevation. These flexible stands permit you to raise the lights as the seedlings grow, so you can quickly move the fixture into the correct height. As an alternative, you may hang a light fixture above the seedlings with hooks and a string, then correct the string length to raise and lower the lights. If you have to use a light that is fixed in place, set boxes or bricks beneath the seedling trays to lift them so they are the correct distance from the lights. Remove boxes from beneath the seedlings to reduce them further from the lights as they grow.

See related

How to Cover Up Smells and Odors in the Kitchen

While the kitchen often is full of temptingly aromatic scents, it also often suffers from unpleasant lingering smells from cooking residue or foods that are burnt. As many realtors bake cookies right before showing a house to eliminate the lingering scent of unappealing kitchen scents and infuse the air with the smell of inviting baked goods, there are also bake-free approaches to cover up odors and scents from the kitchen.

The Power of Vinegar

While that garlic-roasted chicken may have smelled so lovely last night before dinner, then you’re left dealing with remaining odor the next moment. Use vinegar to get more than whipping up salad dressing. Vinegar cleans and deodorizes, which makes it a safe and convenient choice for those seeking a natural way of getting rid of bad smells. Boil a solution of 3 tablespoons white vinegar and one cup of water for 15 minutes to neutralize odors. Put small cups of vinegar countertops throughout the space to deodorize while you sleep. As you are cooking, put a small bowl of vinegar next to the cooker to cover up smells as they happen.

A New Fridge

Several of the worst scents at a kitchen originate from the refrigerator and freezer. Nontoxic baking soda is well-known for its natural ability to eliminate odors. Catch an opened box at the refrigerator to soak up smells. Change the box out every 30 days to ensure freshness as baking soda’s powers weaken over time. The material of the old box can be used to clean different areas around the kitchen, such as garbage cans, seams and drains, even though it cannot be used for baking. For more powerful odors such a rotting fruit or spoiled meat, consider filling a clean sock with dried coffee grounds.

Wash Cabinets

Kitchen cabinets are another haven for unpleasant odors. To get a fast and effortless solution, put a charcoal brick from the cupboard to absorb smells. If the smell stays, remove all things from the cabinets to track down any hidden spills or other sources of the smell. Use a heavy duty cleanser spray, scrub with a sponge, rinse it clean and wipe dry. Put a bowl of white vinegar or baking soda from the cupboard, making sure it’s out of reach of little pets or hands. After a couple of days, the cabinets should smell new. In the event of especially nasty odors in porous wood cabinets, the smell may have penetrated the surface, which makes it almost impossible to eliminate. A fresh coat of paint is a way to cover up bad smells from cabinets in the kitchen.

An Herbal Haven

From warm and inviting spices such as cinnamon, clove and ginger to fragrant flowers such as roses, gardenias and jasmine, aromatherapy scents could ward bad smells. Look for candles, sprays and burning oils that deliver desired fragrances to the space. Even soaking a couple of cotton balls in vanilla delivers an appetizing smell while covering up bad smells, but be sure to keep them out of the reach of small children and animals. As an additional benefit, many of these scents are known to activate improved moods — in the calming affect of lavender into the invigorating allure of mint. Open up all windows to allow in fresh air when filling your house with these aromas.

See related

How to Clean and Protect Naugahyde Furniture

Naugahyde is a brand name for a synthetic material designed for looks and durability, frequently used on furniture. Oftentimes, a little dish soap mixed to water is all that’s needed to wash this material. Furniture wax serves as a protective spray-on coating suitable for Naugahyde, as advocated by the manufacturer.

Basic Cleaning

First wipe the Naugahyde with a damp, white cloth that’s nonabrasive. Water is sufficient to remove some dust and dirt, and using a white fabric guarantees no wax transfer into the stuff. In case the Naugahyde still appears soiled, squirt a little dish soap to hot water, swish it around, then dip a white fabric into the soapy solution, wiping down the furniture. Wash by wiping the item down with a clean damp cloth. If areas appear heavily soiled, scrub them with a toothbrush after applying the soapy water, then wipe clean with a damp cloth.

Protective Measures

Many Naugahyde fabrics are manufactured with a protective coating which helps resist stains. With time, this coat may lose its attractiveness. A furniture spray wax rubbed on clean Naugahyde restores the shine and provides some protection. To guard the Naugahyde’s tint, avoid using harsh chemical cleaners such as bleach or solvents, which might damage the first protective coating along with the material. Do not use paper towels or coloured fabric when cleaning, because these can transfer tints or masks onto the upholstery.

See related

The way to Make Cleaning Supplies That Smell Great

Walking into a house that reeks of food, mildew or other odors is an unpleasant encounter. Nasty smells aren’t only embarrassing, but also implies a lack of cleanliness. Ammonia and mothballs utilized to indicate a clean house, but more options exist now. While store-bought goods deliver powerful cleaning and typically have powerful scents, in addition they contain potentially harmful chemicals. Many homemakers prepare their very natural and fragrant cleaning equipment to create returning home a positive sensory experience.

Vital Oil Euphoria

The new scent of the essential oil is not only visually pleasing; it also packs a heavy-duty cleaning punch. Skip the harsh chemicals and save money by making your own solution using refreshing and fragrant essential oils. Simply add 1 tablespoon of a citrus oil, such as lemon or tangerine, or mix them, to your spray bottle of tap water to create an inexpensive, non-toxic solution that cleans and disinfects stovetops, showers and other household surfaces. Mixed to a bucket of water, two tablespoons of the essential oil provides an all-surface-friendly solution for wooden floors. Clean spots on timber tables using a small number of essential oil onto a cotton ball, which can be particularly effective against sticky spills and hand prints. Insert a drop of a quality olive oil into your mixture, buff with a soft, clean cloth and your hardwood table is going to shine.

Flower Power

Scrubbing the stove, sink and counter tops may seem like drudgery, but the job feels less like work when you surround yourself with the romantic scent of roses. Common baking soda has many family uses, among which is its ability to prevent corrosion by elevating pH values. In your blender or food processor, combine 1 cup of baking soda with 1 tablespoon of salt and 1/4 cup of fresh or dried rose petals. Sprinkle the pulverized mixture on your own cleaning zone and use a moist sponge to clean away dirt and grime. For pick-up carpets, use a combo of 1/4 cup of crushed fresh or dried lavender flowers with 3/4 cup baking soda plus 1/4 cup cornstarch. Sprinkle the mixture over your carpet or rug and let it set. Vacuum up a few hours later surrounded by the soothing scent of lavender.

Tea-riffic

A relaxing cup of herbal tea is not only a digestive remedy. Mix 2 gallons of warm water, 1/2 cup of white vinegar, 2 tablespoons of lemon juice juice plus 1/2 cup of strained peppermint tea to concoct a fine cleanser for wooden floors. The sky is the limit when it comes to using herbal tea for a cleaning source; experimentation with other scents such as ginger, lemon zinger and cinnamon spice. The best part is you don’t even need to rinse. To get a bright scent in a pinch, mix and match your favourite teas to your spray bottle and spritz rooms everyday with revitalizing mixtures of orange peel, chamomile, ginger, vanilla and more.

Benefits Abound

Making your own all-natural cleaning products does not only save money. These fresh-smelling products can also be non-toxic, safer for animals and creatures and irritant-free for most people with chemical sensitivities. These homemade solutions also encourage cleaner air so you’re not breathing in toxic fumes. In reality, research from the EPA indicates that inside air quality is considerably more polluted than the air just out, and store-bought compound cleaners perform a role in this unsettling statistic.

See related

How to Stain a New Picnic Table

Staining your picnic table allow it to blend with your outdoor decor, but that is not the principal intention of stain. As it’s formulated to resist sunlight and moistureand stain helps your table last longer. To get this benefit, however, you need to cover the table thoroughly.

No Sanding Needed

Examine the table for moisture content by sprinkling a few drops of water on the surface. If the wood absorbs them easily, the table is dry, but should they bead up, wait a few days before sealing the wood with stain. Once you’re sure the wood is dry, wipe the table with a moist rag, since new wood tables are often coated with a fine layer of wood dust. There should not be any requirement to sand your new table.

Stain the Underside First

Lay plastic sheeting on the floor and turn the table over — you will need help for this. Stain the undersides of their camel and benches, in addition to the legs and legs, by applying the stain using a paintbrush. Wipe off any stain that’s been consumed after about 5 minutes using a rag to keep color uniformity. Turn the table erect when you are done with the bottom and stain the cover of the table, then the seats, in addition to the borders and end grain. Allow the table dry overnight before applying it.

See related

Painting Over Powder-Coated Steel

Among home paint jobs, painting over powder-coated steel may seem the most frightening for the do-it-yourselfer. This work really does not need to be this tricky. A little basic prep work and cautious paint choice will likely have your powder-coated steel cabinets, furniture and entry doors seeming bright and brand new in no time.

Prep Work

If you’re able to, move the work to a tidy, well-ventilated space, or outdoors. Clean powder-coated surfaces thoroughly with all-purpose cleaner. If grime or grease remains, use mineral spirits and also medium steel wool to eliminate it. If the surface has peeling or delicate paint — it scratches with a fingernail — eliminate it with a putty knife or a razor blade scraper. Smooth the remaining paint and then give it a scratchy texture with 220-grit sandpaper. Sand rusty surfaces to bare metal, then wipe with mineral spirits.

Prime

Wash, powder-coated surfaces don’t require priming. Prime rusty surfaces with metal primer. Prime, too, surfaces with stubborn grease and grime. You don’t need to prime the entire job, just the affected regions. Pick light, light or dark primer to approximate the value of your top coat. Spray primers result in fast work and fast drying. Use exterior primer for exterior surfaces, such as steel entry doors.

Spray Painting

Painting with cans of satin, satin or gloss spray paint makes it easy, fast work that rather approximates the appearance of new powder-coated steel. Read the label instructions regarding temperature recommendations, drying times and other details about your goods. Holding the can 10 to 12 inches in the work, start spraying the surface off before spraying the true bit, moving the could from 1 end of the work until you’re off the surface in the opposite end. Repeat for complete reporting. Use the paint in several thin layers to cut back sags and drips.

Brushing

If you can not move your work to a ventilated place, spraying may not be sensible. Use latex paint along with a synthetic brush, applying the paint in long, smooth strokes. On steel entry doors, use a brush and exterior latex paint to approximate the painted finish of a wooden door. Brush “with the grain” — where the grain could be about a wood door — for a realistic, hand-painted wood appearance. On cabinets and furniture, brush on doors and sides, and horizontally — or left right — about tops and drawer fronts.

See related